Hi there!
Today's post will just be a super quick one, it's late here and I'll no doubt have to get up early with Charlotte.
I just wanted to quickly show you what I've been working on. I decided to do the December Daily with Ali Edwards this year, I've heard of it before and loved the idea but thought I'd never have time to do it all. Next year I definitely plan on being organised earlier as Ali was, but I had some issues getting the album I was hoping to get (living in Australia is REALLY Frustrating when you need craft supplies fast). SO long story short, I got an album that I really wasn't sure I loved, but now I've had my way with it *wink*, I'm close to being in love with it...it still needs one more thing--I just don't know what that thing is!!
So here is my cover;

I had a LOT of trouble deciding what I wanted to do. You see, all year this year, I've been dealing with a LOT of Americans (especially working with and running a blog and DT for a U.S based company!) and I've really not been feeling the Christmas vibe here in Australia because it's so hot.
I've always wished for a white Christmas as I've mentioned before, but this year especially, it just doesn't seem like Christmas with this heat!! So I wanted to create an album that was reflective of how OUR Christmas is, hot, sunny, bright etc, but finding Christmas ornaments and decorations that don't have snowmen, stockings, the word snow, snowflakes, etc etc was proving impossible.
I've always wished for a white Christmas as I've mentioned before, but this year especially, it just doesn't seem like Christmas with this heat!! So I wanted to create an album that was reflective of how OUR Christmas is, hot, sunny, bright etc, but finding Christmas ornaments and decorations that don't have snowmen, stockings, the word snow, snowflakes, etc etc was proving impossible.
I thought and thought and thought and eventually decided to just make the album pretty and use colours based on our Christmas tree this year--which looks like this:

Anyhoo, here are a few close ups

To make this section I used my Silhouette-baby (she needs a name...hmmm any suggestions?). I cut 3 of the exact same image out of kraft cardstock then CAREFULLY glued them together, this gives the effect of chipboard. (THANKYOU NICHOL MAGOUIRK FOR THE AMAZING IDEA!!) See the cool dimension?! LOVE IT
I gently distress inked over the image with Antique Linen (and a TINY bit of Walnut stain on the edges, just to make the lettering stand out a tad more.
Here is another angle so you can see my Diamond Stickles Star at the top :)
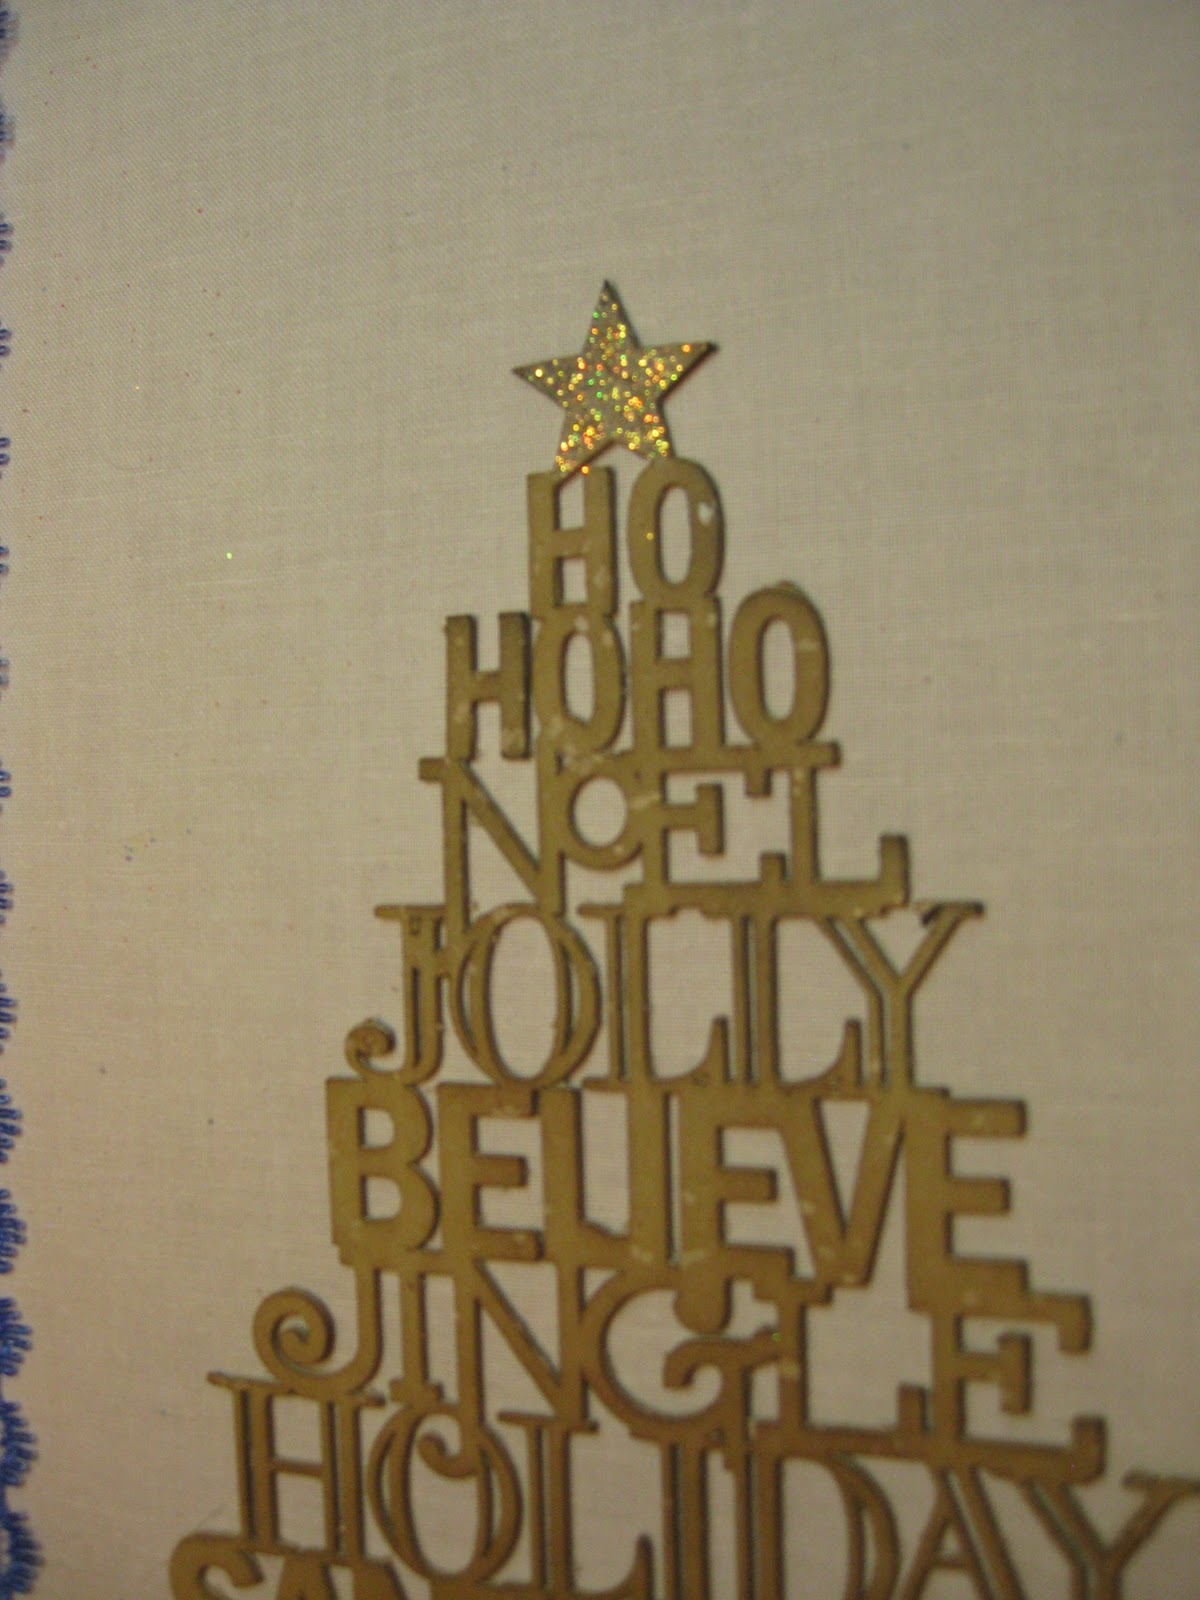
Here is another Silhouette diecut word--I loved Nichol's title font so I copied a bit :) but made mine sunny yellow, with a hint of diamond stickles on the top (I can dream of snow right?!). I also layered this on 2 layers of kraft cardstock to give it height, but I put the yellow (top) layer on slightly off centre so that it gave a shadow effect. (Thanks again to Nichol for the inspiration :))

This next little section really gave me trouble, I re-did and re-did and re-did it. *sigh* I'm happy with it now, but maybe one thing more...I'm thinking it needs a button :) buttons always make things better right!? Anyhow, after looking at Sarah Martina's DD album, I was struck with inspiration (are you noticing it's taking a lot of other people to get my creative brain to work?! lol)

There are a lot of layers here.
1. a doily that I Glimmer Misted with jade green (can't remember the name and I'm too tired to get up and search for the bottle--sorry!)
2. Then 2 Silhouette diecut snowflakes that I've put Diamond AND Icicle stickles over (one of which I distress inked with Tumbled glass first)3. then I diecut (yup, with the Silhouette) a star shape 3 times out of kraft cardstock, stuck them together, added some tiny "sugar glitter" that I've had in my stash forEVER, painted it gently with white paint and added a tiny bit of gloss over the top.
4. Finally the numbers are just little glittery diecuts that came in a pack for about $2 from a super cheap craft store we have in Perth (they're the cheapest in the whole city to tell the truth, but not all of their stuff is great quality, however, they're fantastic with the prices!)
I've got my journalling and photos organised for day 1. Day 2 was decorating the Christmas tree with Isabella but I haven't journalled it yet, I'm letting the thoughts and words simmer in my head a bit (otherwise I find I babble if I just type 'on the go'. Day 3 is today and honestly? We did nothing Christmassy at all, but I finished my journal cover, so I'll be making that my story for the day :)
I'd kind of semi-planned to do the online class of Journal your Christmas, but the last time I tried to do an online class, it was a complete bust. The email prompts just went straight into a file in my inbox. Hmmm maybe though.
I'd kind of semi-planned to do the online class of Journal your Christmas, but the last time I tried to do an online class, it was a complete bust. The email prompts just went straight into a file in my inbox. Hmmm maybe though.
I'm having a hard time getting PhotoShop Elements to work for me. I can get the layers right, but they never seem the right size. When I get an overlay in the right position, I try to resize it but the lines get fat and look distorted...I have no idea. Any hints?? I'm a complete PSE FAIL!!! Knowing me I'll just give up and put plain photos in. (this would be easier if my printer hadn't decided to DIE this week. GAH!!!

This is a Whiff of Joy Elephant and the grassy area, coloured in Copic Markers. The sky is a Hero Arts cloud background stamp stamped in Soft Blossom Shadow Ink (Pink Elephant was my original plan, but then I thought a pretty pink sky would be cute). The banner and letters within are Lawn Fawn :)
OK, I'm off to bed! this took longer than I thought it would (always does!)
Take care lovelies--what are you doing to get ready for Christmas? I'd love to hear your traditions/stories :)
Take care lovelies--what are you doing to get ready for Christmas? I'd love to hear your traditions/stories :)


No comments:
Post a Comment